Sunday, December 9, 2012

Retro Sunday Squared - Vintage Holiday Revlon Streetwears!


Happy Sunday everyone!

Today Dana and I have for you some vintage holiday Revlon Streetwears! Of course, Revlon Streetwear is one of my all-time favorite vintage brands and I feel very lucky to have quite a few of the holiday ones in my collection. All of the ones that I am going to show you all today are quite rare, and I never thought I would own any of them in my lifetime!

A quick note - my cuticles are absolutely ravaged right now. I have been so busy with school and finals, getting ready for the holidays and then the blog sale this past week that I have just not been caring for them like I should. I have naturally AWFUL cuticles anyways so it's just difficult to keep them up to par in the winter anyways. So be warned, my cuticles are awful this week!

Don't forget to check out Dana's Holiday Streetwear post over at Polished Claws Up!

~~~~

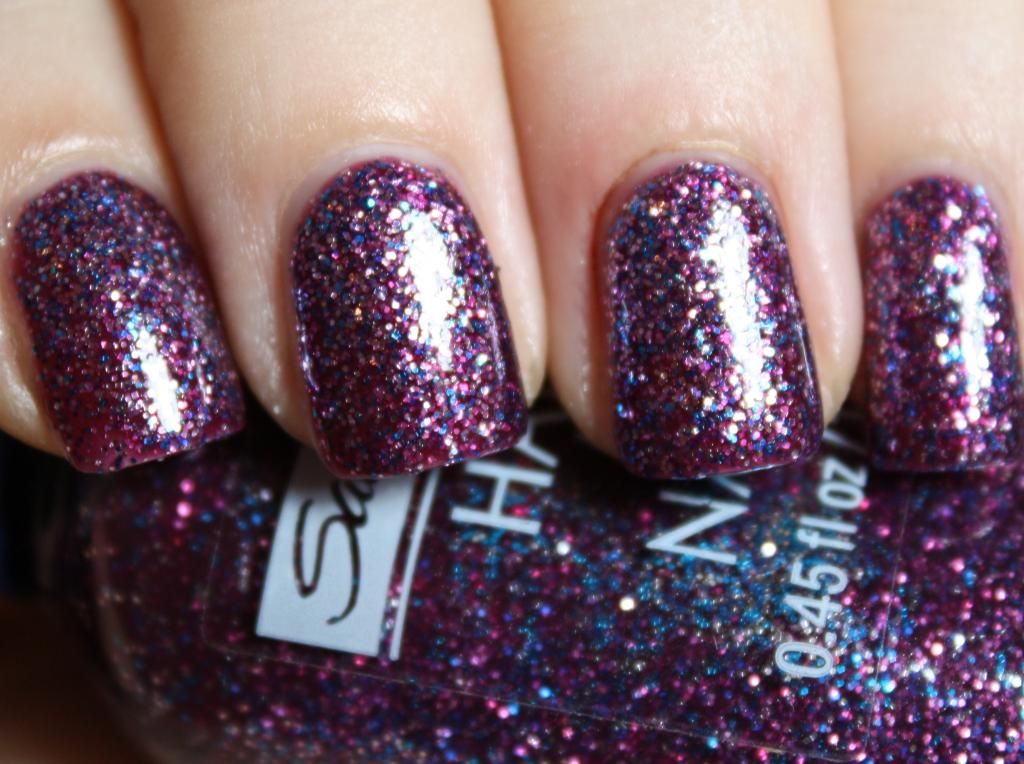
First up is Revlon Streetwear Rudolph. Rudolph is a red glitter in a clear base. Pretty standard, but essential for any Streetwear collector. The formula of Rudolph was pretty tricky. It was thick and gloopy and upon my first coat of it, I realized that there was no way this glitter was going to be opaque. So, on top of that first coat of glitter, I layered a coat of Revlon Streetwear Mrs. Claus, a red jelly from Streetwear's holiday collection as well. The effect of this jelly sandwich was amazing! It looked like China Glaze Ruby Slippers! I layered another coat of Rudolph on top of that and it was perfect. Just gorgeous! I am definitely going to be wearing this combo again before the holidays are over. It just screams Christmas to me!

So here's 1 coat of Streetwear Rudolph, 1 coat of Streetwear Mrs. Claus and 1 more coat of Streetwear Rudolph. Enjoy!


~~~~

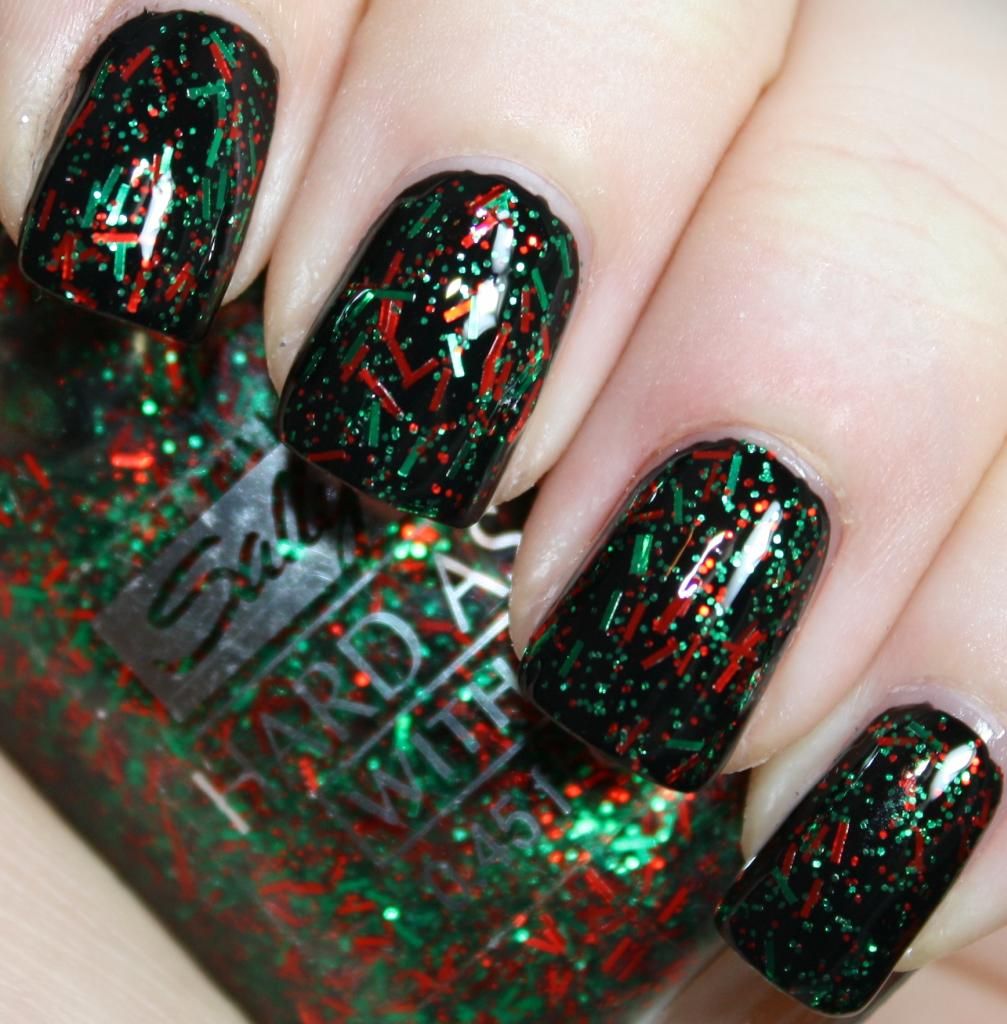
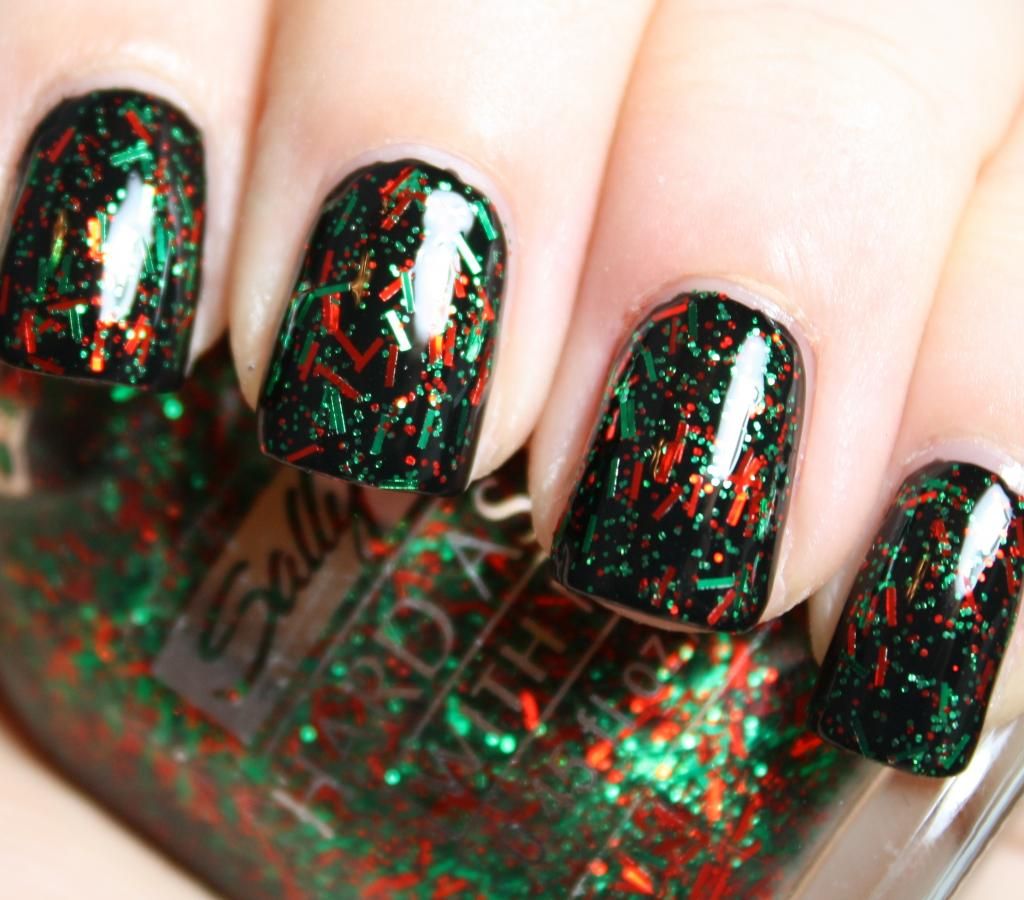
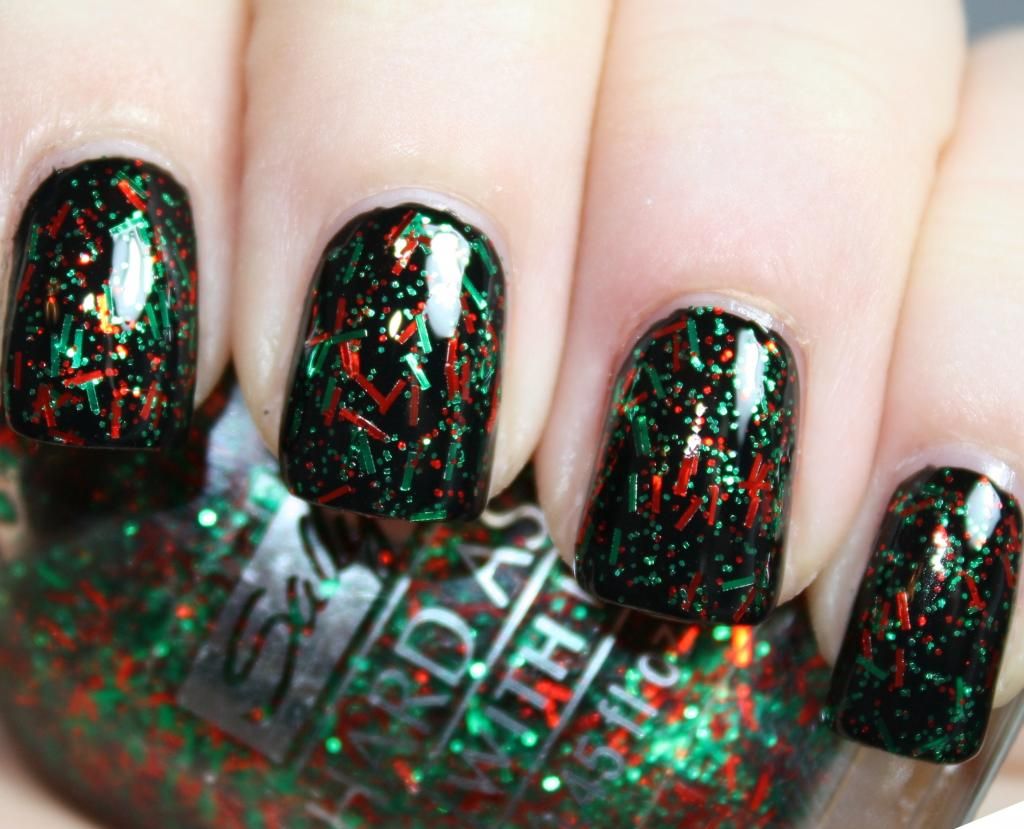
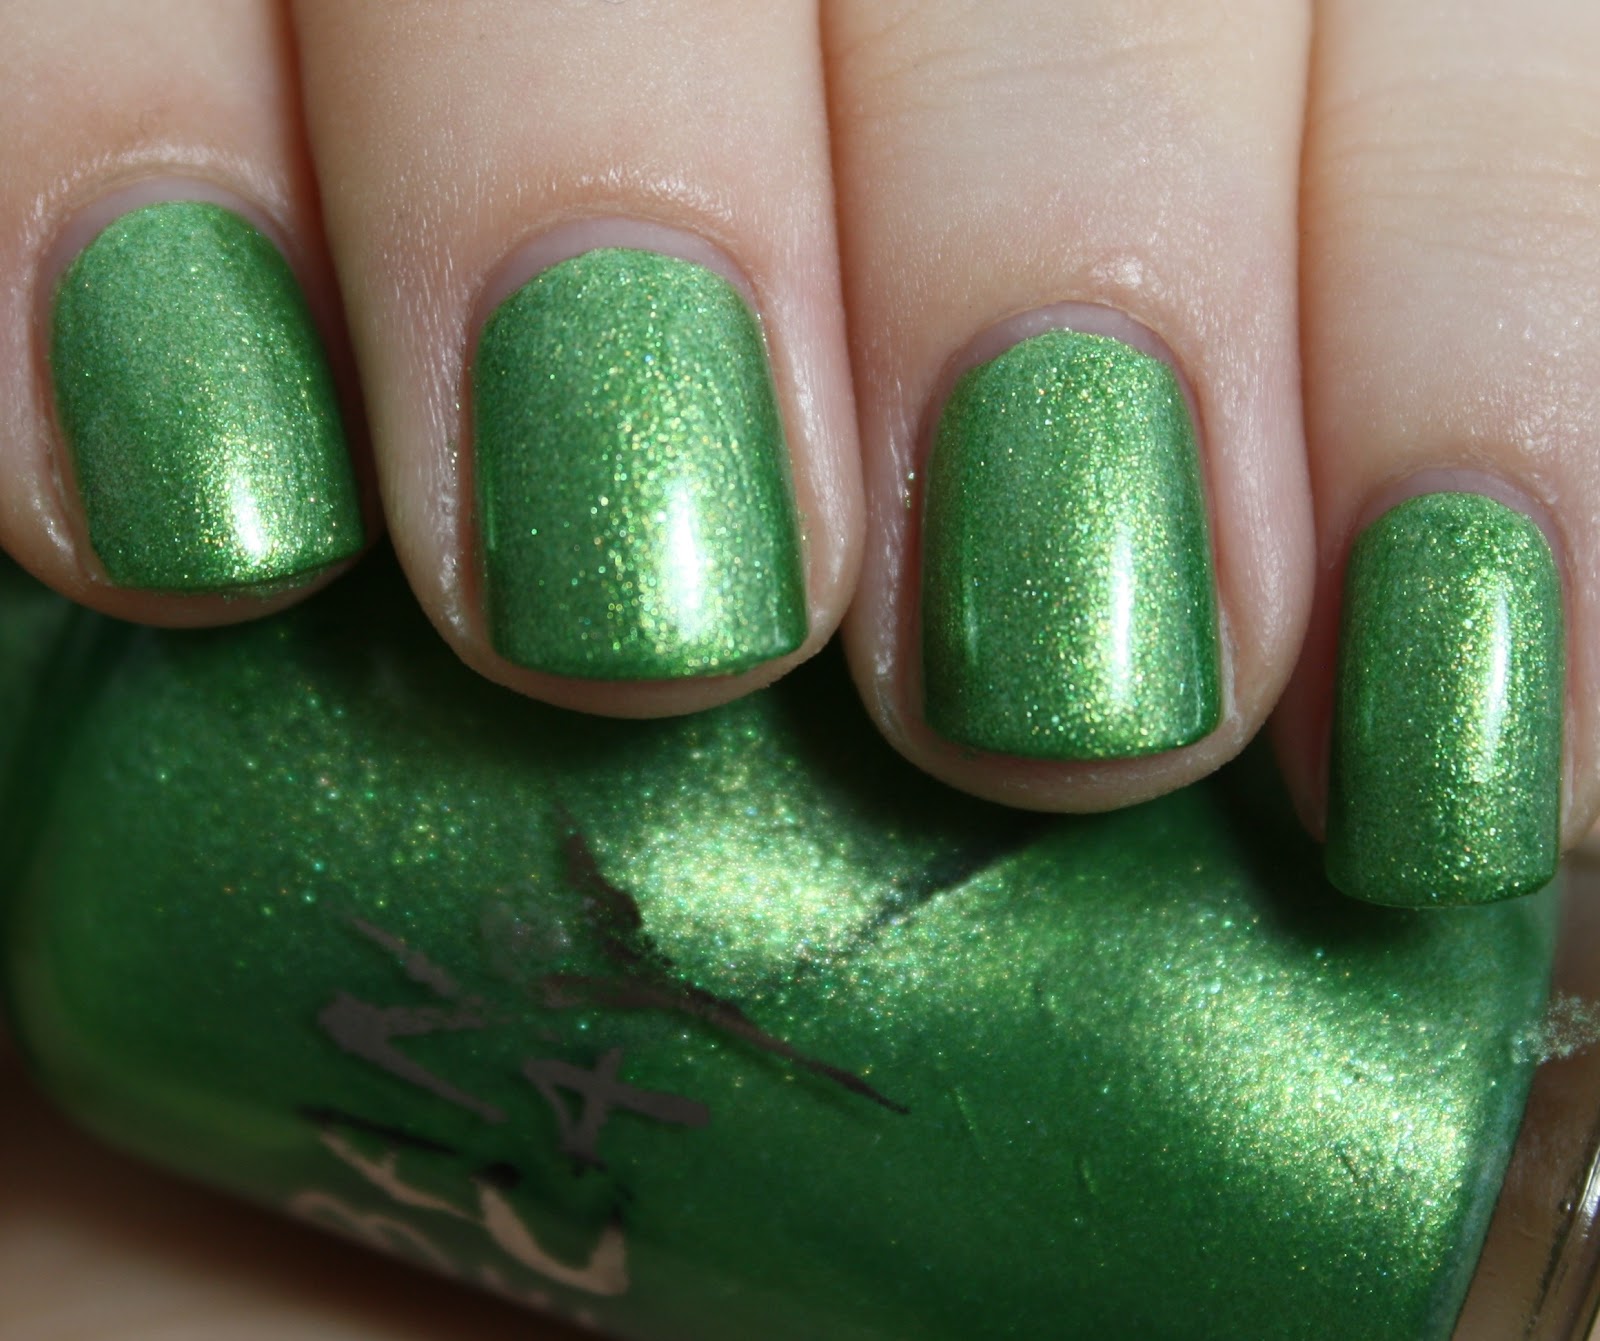
Next up is Revlon Streetwear Kwanza (yes, that is the way this polish is spelled even though the correct spelling for the holiday is "Kwanzaa"). This is probably one of the rarest Streetwears I own and one of the most unique polishes in my entire stash. Kwanza has a clear base with green square glitter, thin red bar glitter and then a thicker black bar glitter. I don't have any polish with that combination of glitters, nor do I know of any! 

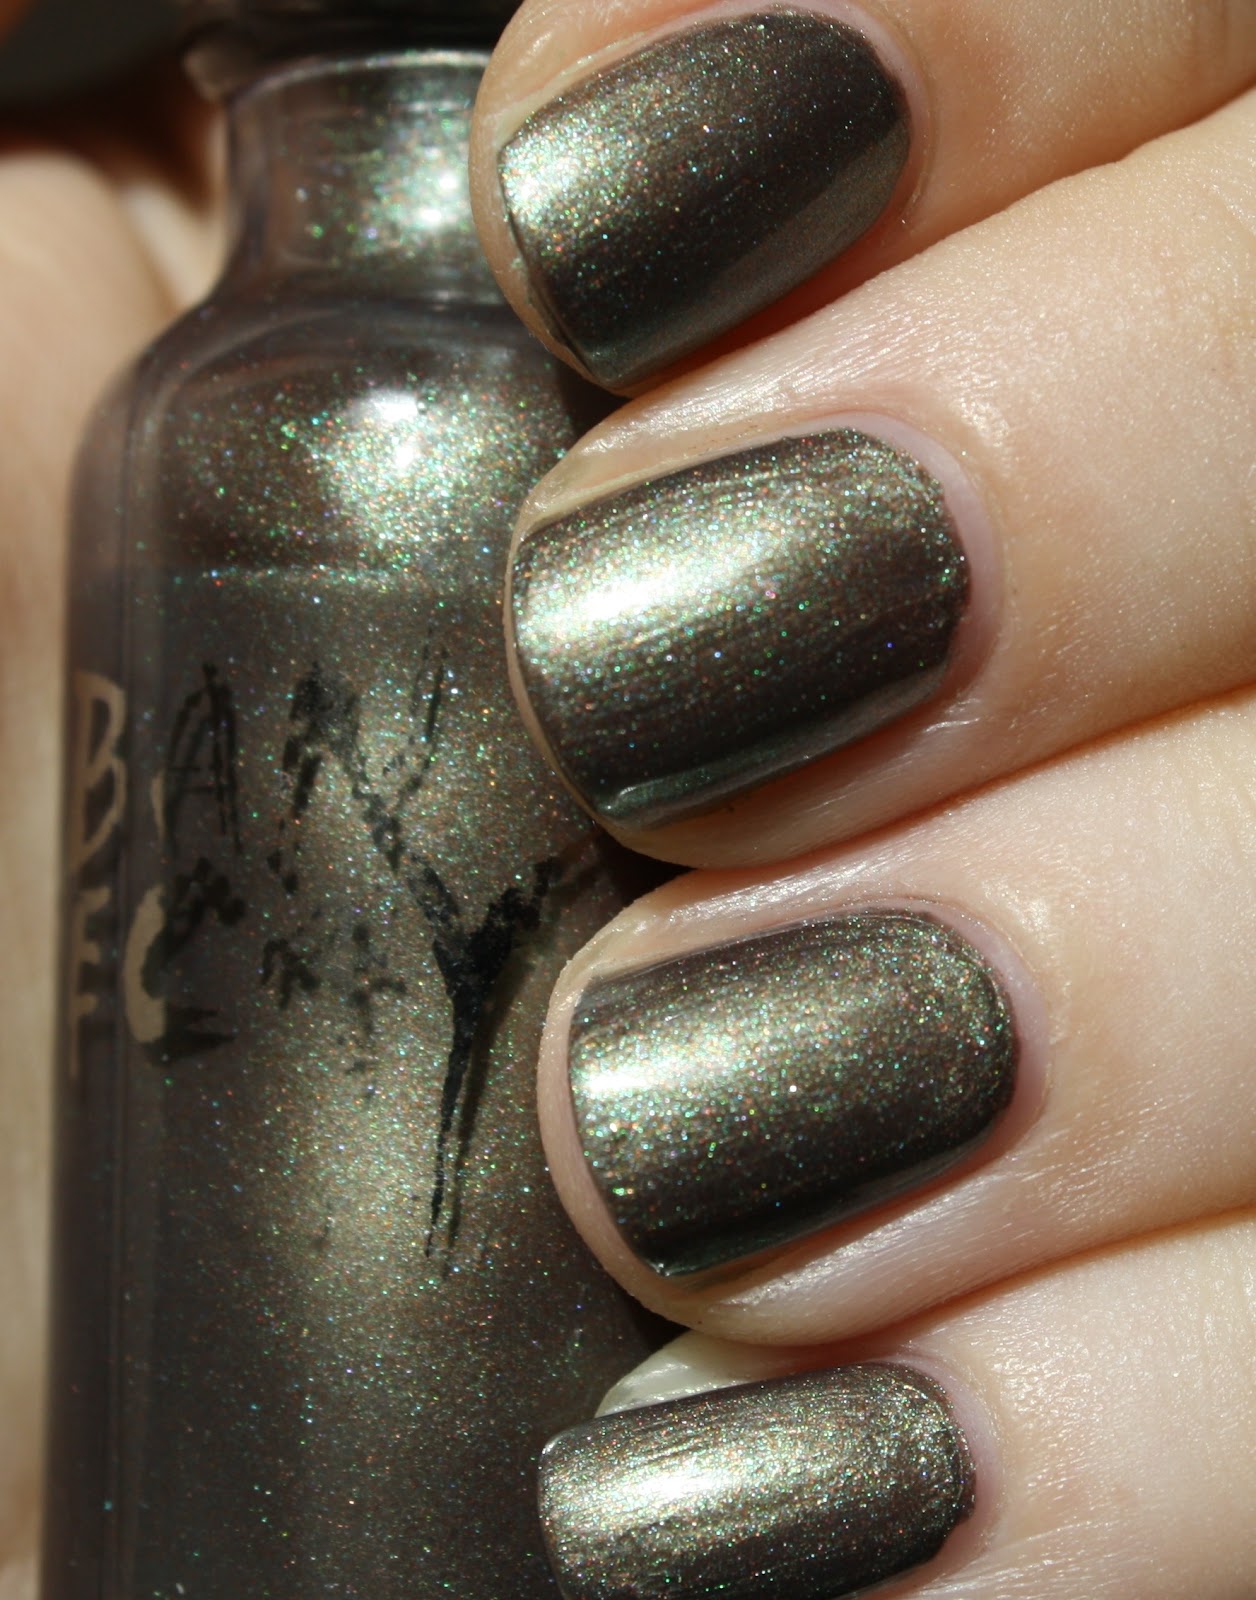
I've decided to show you guys Kwanza over two different polishes today to showcase the different types of glitter. First, I've layered it over a pure black to let the red bar and green square glitters shine! But I always wanted to show you all the black bar glitters as well, so Streetwear Mrs. Claus to the rescue again! I layered Kwanza over Mrs. Claus, which helps the green and black glitters stand out, and the red glitters just glow against the darker red background of Mrs. Claus. So fun and festive!

So here's 1 coat of Streetwear Kwanza over Finger Paints Black Expressionism and then 1 coat of Kwanza over Streetwear Mrs. Claus. Enjoy!


Here's all the polishes I used today! From L-R: Streetwear Kwanza, Streetwear Mrs. Claus and Streetwear Rudolph.


~~~~

That's all for today! Hope everyone is having a great December so far!

Sunday, December 2, 2012

Retro Sunday Squared - Vintage Sally Hansen Christmas Glitters

Hi everyone!! Long time, no see! I have missed you all lots! I've been running low in the time department lately so sadly my blogging has taken a back seat but I had to squeeze in a blog post for you all today! Today, my vintage partner in crime, Dana over at Polished Claws Up and I have decided to share some of our vintage Sally Hansen Christmas glitters with you all today! You guys may remember our vintage SH Halloween glitters, and these ones are just as fantastic. Both Dana and I are huge vintage Sally Hansen fans so we are super stoked to share these with you today! We don't know the exact date on these polishes, but I assume they came out during the late 90's-early 00's like most of the other amazing vintage Sally Hansens out there.

Don't forget to check out Dana's post over at Polished Claws Up!

~~~~

First up is Sally Hansen Festive. Festive is a green and red bar glitter with little green and red micro glitters scattered throughout. It has a clear base, so it is best for layering. I decided to layer it over black and I love how it looks! 

Here's 1 coat of Sally Hansen Festive over black. Enjoy! (P.S. gnarly cuticle warning!)


Next up is Sally Hansen Sugar Plum. Sugar Plum is a light pink, blue and light purple glitter in a purple jelly base. I don't know if the base is purple due to age or if that's how it was back in the day. Either way, the purple base allows me to layer it to full opacity and that is a win in my book! Love how this is still Christmas-y without being your typical red or green. Love it!

Here's 3 coats of Sally Hansen Sugar Plum. Enjoy!


Thanks for stopping by everyone! I hope to see you all again soon <3

Sunday, November 11, 2012

Retro Sunday Squared - Vintage Urban Decay Polishes!

Happy Sunday everyone!! Dana over at Polished Claws Up and I are back today with another edition of Retro Sunday Squared! We decided to swatch some of our vintage Urban Decay polishes for you all today. For those who know me or have been reading my blog for awhile, you know that Urban Decay is one of the brands that started my vintage polish obsession. Back in middle and high school in the 90's and early 2000's, Urban Decay was one of my favorite brands of polish.When I got back into nail polish, I set out to find myself some old bottles of UD polish. While it was quite easy to get my hands on the 2nd generation Urban Decay polishes (the silver capped ones) what I was really looking for were the older, 1st generation UD's from the original 1996 release.

Acquiring these super vintage Urban Decay polishes proved to be quite a challenge. I found it easier to seek out OPI polishes from the 80's and first generation Hard Candy polishes than to get my hands on these 1st generation Urban Decays! By chance, I found a bottle of 1st generation Dude (swatched here) on etsy and I figured that would be it for 1st generation Urban Decays. It took me almost two years to find that one and I assumed I would never find another one ever again. However, the itch to find more quickly resumed and I started turning to other bloggers to find them. I found the lovely Diane over at The Beauty Alchemist had 2 old school UD's on her blog and I contacted her and asked if she would be willing to part with them. Luckily, she was and I have swatched both of those polishes today!

When these polishes came to me, they were completely dried up. Every single 1st generation Urban Decay polish I have acquired has been dried up. This is part of the reason why I believe that hardly any 1st generation Urban Decay polishes exist today - there is a default in the design of the cap that allowed too much air in and dried up the polish inside. Back in the day when no one really knew about thinner, the solution was to just toss these polishes away. Thank goodness for the lovely people who knew better and kept their polishes despite the fact that they resembled little hockey pucks sitting in a bottle. Anyways, I took a huge bottle of my handy dandy vintage polish reviver, Seche Restore, and with some shaking and mixing, these bad boys were as good as new!

Soon after, I received four more vintage Urban Decays from the awesome Jet over at Idee Fixe and my first generation UD polish collection now has a grand total of seven! I am pretty happy with my little collection, considering I never thought I would own even one of them! With a lot of thinner and a little bit of patience, all seven polishes have been brought back to life and are ready for polishing! I will show you the polishes from Jet soon but today I have for you Urban Decay Shelter and Stray Dog from the 1997 Urban Animal Collection.

So I hope you guys enjoy these first generation Urban Decay polishes I have for you today! Don't forget to check out Dana's post over at Polished Claws Up! today. She has some second generation Urban Decay polishes for you all. Note the different in the bottle shapes and the logos! 

~~~~

One quick note - I have nubbed my nails. Not really a big deal but I just wanted to warn you all. I have gone without a break on my swatching hand since July and I'm sure I could have gone for much longer, I was just getting sick of having long nails. To be honest, I'm not really a fan of having long nails but my nail beds are all different lengths so it bothers me to have short nails. I keep my nails long so that they can all be a uniform length. But this week I said TO HECK WITH IT and chopped those babies off. Let me tell you, I am really digging having nubs again. I may keep them this way for quite a while. Yeah, they're all uneven and look kind of weird but I love them. Sorry long nail fans, these nubs are here to stay!

~~~~

Anyways, first up today is Urban Decay Shelter. Shelter is from the 1997 Urban Animal Collection, which Urban Decay created in collaboration with designer Todd Oldham to benefit animal welfare. If you are familiar with the Urban Decay brand, you know that animal welfare is always something they have advocated which is one of the many reasons I love UD. Shelter is an AMAZING green glass fleck polish that is so packed with glass flecks that it is almost metallic. LOVE IT! The formula was fantastic even as old as this polish is.


Here's 3 coats of Urban Decay Shelter. Enjoy!


~~~~

Next up is Urban Decay Stray Dog, also from the 1997 Urban Animal collection. Stray Dog is probably one of the most unique and amazing polishes in my entire stash. It has a gunmetal grey-taupe base, and it is packed with red and green shimmer. When I first saw this polish, I figured it was just a grey with green flash but it is so much more than that. Never have I seen shimmer like this in a polish before. The green and red color of the shimmer almost make this polish Christmas-y! It is absolutely amazing! I had a tough time capturing the shimmer in pictures, so you may have to enlarge the pics to see what I'm talking about. The formula on this one was a bit tricky, but the reason why I had a bit of trouble with this one wasn't because of the formula but because of the brush. It was extremely misshapen and just terrible. Oh well, I still managed to get this on without any major problems.

Here's 2 coats of Urban Decay Stray Dog. Don't forget to enlarge these pics to check out the phenomenal red and green shimmer in this puppy!


 ~~~~

What do you guys think? Do you have any 1st generation Urban Decay polishes? Any 2nd generation Urban Decay polishes?

Thanks for stopping by today everyone! I know I have been in and out lately as I have been extremely busy these past few weeks so thanks for sticking around. Love you guys!

Sunday, November 4, 2012

Retro Sunday Squared - Vintage Cover Girls!

Hey everyone!! Sorry this post is a bit late today, I'm having some crazy camera issues. Better have the husband take a look at that. Anyways, welcome to another edition of Retro Sunday Squared with Dana over at Polished Claws Up! Today Dana and I decided to swatch some vintage Cover Girl Nail Slicks for you all! CG Nail Slicks were among my favorite polishes back in the day. I even remember getting this huge giftset of Nail Slicks one year back in the 90's in my Christmas stocking and I was in heaven! 

First up is Cover Girl Nail Slicks Mystic Peacock. I saw Mystic Peacock on Dana sometime last year an I fell in love! It is such a gorgeous polish. Mystic Peacock has a blackened teal base with teal shimmer throughout. SO GORGEOUS! I'm not sure how old this polish is but it's definitely from the 1990's. It has that watery, non-3-free formula that was a bit difficult to keep from flooding my cuticles. As a vintage polish lover, this is the kind of thing I expect and it didn't bother me at all. In fact, I think these watery formulas help the shimmer in polish shine through through the layers and add so much depth. Anyways, it took three coats to reach opacity.

So here's 3 coats of Cover Girl Mystic Peacock. Enjoy!


Next up is Cover Girl Mattalic Silver Violet. Silver Violet is a sueded matte silvery-purple polish. I absolutely LOVE this one. I'm not sure what year this came out but I'm guessing early-to-mid 00's. The finish reminds me of the OPI Suedes or the new Avon Suedes that recently came out. I believe this was the first brand to do something like that. In fact, Cover Girl was the very first brand to do crackle polishes back in the day. Believe it or not, Cover Girl was once at the forefront of the nail polish world. I don't even think they do nail polish anymore. Anyways, the formula was a bit tricky as most mattes can be. I had some bald spots and dragging so this took three coats to opacity. Overall, a really cool polish and I'm glad to have it in my stash!

Here's 3 coats of Cover Girl Silver Violet. Enjoy!


Thanks for stopping by today everyone! Don't forget to check out Dana's vintage Cover Girls over at Polished Claws Up! Have a fantastic Sunday!

Wednesday, October 31, 2012

Happy Halloween! China Glaze Fortune Teller

Happy Halloween everyone! My favorite holiday of the year is finally here!

Today's quick post is of my all-time favorite black and orange Halloween nail polish, China Glaze Fortune Teller. Of course, black and orange is a very popular color combination for Halloween themed polish, but none of the other polishes do it quite as well as Fortune Teller does. Fortune Teller was part of China Glaze's 2009 Halloween collection and is now pretty hard to find. Another good one from that collection was Spellbound, which is another favorite of mine and even more hard to find than Fortune Teller. Alas, I ran out of time to swatch Spellbound for you all. I will definitely be sure to bring it out next Halloween!

Anyways, China Glaze Fortune Teller is a black jelly base packed with a few different sizes of orange hex glitters. It sounds simple enough but the effect it has is absolutely stunning!! Pictured is 3 coats, and it was fairly easy to apply with no problems in the formula. It's almost an unwritten rule that when you wear Fortune Teller, you HAVE to put a matte topcoat over top because it enhances the awesomeness. Hey, I don't make the rules! So of course, I have pictures of it both with regular top coat and with a matte topcoat today.

So here's 3 coats of China Glaze Fortune Teller, first with regular top coat and the last two with a matte top coat (I used Essie's). Enjoy!


Thanks for stopping by today! I hope you've all enjoyed the Halloween polishes that I showed you this year. I was hoping to do more, but life just got in the way this time around. But hey, there's always next year!

Hope everyone has a safe and Happy Halloween!!!! 


Tuesday, October 30, 2012

Piggy Polish Lightmare

Good morning my lovelies!! Happy Halloween Eve! I hope everyone in the path of Hurricane Sandy is staying safe! I live in Cleveland and although not technically in the direct path of Sandy, it collided with a major cold front and we've been experiencing some crazy winds and rain here. We've had lots of flooding, power outages and major storm damages in the area. Over 500 schools and school districts in the area were closed today (my school not being one of them, of course) so things are definitely crazy around the CLE today. Frankenstorm indeed!

Anyways, back to the polish! Today I have for you another great Halloween polish, Piggy Polish Lightmare. Piggy Polish is a brand that is exclusively available at Ulta and I have never picked up one of their polishes until now. Lightmare is an LE Halloween polish that Piggy Polish released this year, and it proved pretty difficult to me to find. I went to 4 Ultas before I finally was able to snag the very last bottle in the display! This polish is popular for good reason - it is fantastic!!

Lightmare has a base of small gunmetal glitters with coppery-orange medium sized round glitters thrown in! I can definitely say I don't have anything like this in my stash, which is great because a lot of the big brands' Halloween polishes tend to look the same after awhile. The formula on this was a bit tricky, it was pretty gloopy and hard to work with. Pictured is two coats of Lightmare, and these two coats were kind of difficult to smooth out but the end result was well worth it. I did do a coat of Seche Vite over it and it was still a bit gritty but not too bad. My bottle of SV is getting kind of thick anyways so it's been smoothing out glitters quite nicely. Lightmare has a Halloween feel to it without being too run-of-the-mill orange and black. I would say it is a solid 9 out of 10 in my book!

Here's 2 coats of Piggy Polish Lightmare. Enjoy!


Thanks for stopping by today! Hope everyone has a splendid day =)


Thursday, October 25, 2012

Dollish Polish - What's This? What's This?

Good morning everyone!! Today I have for you another polish from this year's Dollish Polish Halloween collection, What's This? What's This? This Nightmare Before Christmas inspired collection is definitely my favorite Halloween collection that came out this year from any brand, big or indie brand. The colors in this collection are so varied and cover every possible facet of the season, from glow-in-the-dark glitter, to a slimy looking green color, to vampy and deep colors to your traditional Halloween colored glitter bombs.

What's This, What's This is a veritable glitter extravaganza with all the colors of Halloween. There's 2 different shades of green glitter, 2 different shades of purple glitter, orange glitter, black glitter and white glitter in all different shapes and sizes. There's small squares, there's big squares, there's big hexes, there's small hexes, there's micro glitter, and there's bar glitter.  WHAT IS THIS? It is the ultimate Halloween polish, that's what it is.

Application was average for a glitterbomb, it took a bit of dabbing and it was kind of gloopy. The brush that I got in my bottle was pretty deformed, so that probably contributed to the bit of difficulty I had with application. But overall, I was extremely pleased with this polish and I honestly could not imagine a more perfect Halloween glitter.

Here's 2 coats of Dollish Polish What's This? What's This? over Finger Paints Black Expressionism. Enjoy!


What do you guys think? What would your ultimate Halloween glitter look like?

Thanks for stopping by today! See you all soon for more Halloween goodness! Can you all believe that Halloween is just around the corner?! I can't wait!!!

Wednesday, October 24, 2012

Sephora by OPI - If You've Got It, Haunt It

Hello my lovely readers!! Quick apology for my absence, I have a lot going on in school right now so my posts are going to be sparse for the next few weeks. But never fear, I could never abandon you all! I'm back today with a quick post of one of my favorite Halloween polishes in my stash, $OPI If You've Got It, Haunt It. I believe this is one of the only (if not THE only) Halloween collections that Sephora by OPI has done and this was definitely the standout of the collection. I believe the other two were a white glow-in-the-dark polish and a matte black. In fact, If You've Got It, Haunt It blows pretty much everything that the regular OPI brand has done for Halloween in a few years as well. I'm a huge fan of this polish and I hope you guys enjoy it!

If You've Got It, Haunt It is from Sephora by OPI's 2010 Halloween collecton. It is a very unique polish, I have nothing like it in my stash! IYGIHI is has a smoky grey jelly base packed with black glitter with silver and blue opalescent micro glitter that flashes blue, green and orange. At the time, this polish was kind of a big deal due to the use of black glitter. Nowadays black glitter is everywhere but this polish still holds a special place in my heart because it is so cool looking. It was super thick and I probably could have gotten away with one coat but I did two for photos. It doesn't exactly scream Halloween to me but I love it just the same =)

Here's 2 coats of Sephora by OPI If You've Got It, Haunt It. Enjoy!


What do you guys think?

Thanks for stopping by today everyone and I hope you all are doing well! I can't wait to catch up on everyone's blogs and see what you all have been up to! Talk to you all soon =)